Friday, 16 March 2012

KS Help Notes_Accounts 04_Moving Library Content Between Accounts


MOVING LIBRARY CONTENT BETWEEN ACCOUNTS


It is possible to move Published tests and Published modules from one KS account to another.

Go to the Accounts > Manage Content page.  Here you can assign (or unassign) KS tests, Published tests and modules, one at a time, to (or from) other accounts in your organisation.

Use the drop-down to select the relevant test/module from your library. Use the radio buttons to select the test/module to be copied across to (or removed from) additional accounts. Click Continue to proceed to step two.


Check the box(es) of the accounts you want the test/module to appear in. If a box is already checked, that means the account already has this test/module assigned. Unchecking a box will unassign content from that account.


Click Save to register your changes.


R

KS Help Notes_Accounts 03_Set up New Account


SETTING UP A NEW ACCOUNT


KS administrators can set up new accounts in their organisational hierarchy.

Go to Accounts > Add New Account and enter the details for the new account.

Choose which type of administrator you wish to assign to the new account. A Full administrator has permission to access the main dashboard. A Sub administrator can only set up test sessions from a browser.


Click Continue to move to step two, where you can assign which KS ‘off the shelf’ test titles will appear in your new account.


Click the Create New Account button to add the new account to your organisation chart.

To view the new account in your organisational chart, go to the Accounts > Your Accounts page and select the View Account Structure button.


Your new ‘child’ account will display underneath the ‘parent’ account that was used to create it.


R

KS Help Notes_Accounts 02_Managing Your Administrators


MANAGING YOUR ADMINISTRATORS


It is possible to add new administrators, delete existing administrators, edit admin status and account access permissions. You can also select which administrators receive system emails.

Go to the Accounts > Your Accounts page to view accounts for which you have administrative control. Separate accounts are typically used to organise data into distinct groups, perhaps geographically, by business sector or industry discipline. This is useful when administrative access to data needs to be assigned to particular individuals or offices.

Click on the Administrators icon next to the account name, to view a list of administrators for that account.


Use the drop-down menu to change the status of each administrator on the account. 'Full Admins' will have the same access and permissions as you, to all the features and data in the account. 'Sub Admins' can only set up test sessions from a browser; they have no admin dashboard access or privileges.

Delete administrators using the ‘Remove administrators’ icon. Select which administrators receive account update emails (i.e. results emails, invite emails, etc.), by clicking the email ‘toggle’ icon.


Use the Add administrator fields to add new administrators to the account. The user will be notified by email that they have been granted access to your account.


Go to the Accounts > Admin Permissions page and select the magnifying glass icon to determine the highest account level permission for each administrator.


Here you can set the highest account permission for administrators. Use the radio button to select the relevant account, then click Save to register your changes.


R

KS Help Notes_Accounts 01_Linked Accounts


KS ACCOUNTS 


If you are the administrator on two or more KS accounts, it is possible to view your account hierarchy and navigate between accounts. You can also view and manage information across linked accounts.

Account Hierarchy

On the Accounts > Your Accounts page, select the View Account Structure button.


This displays your account hierarchy, where you can view the organisational structure of accounts, for which you have administrator permissions.


Switching Accounts

Use the Switch account link to move between KS accounts. The name of the account you are currently logged into will be displayed top right of your dashboard page.


Viewing Linked Accounts

Use the dropdown menu to view linked accounts on the following dashboard pages:  Library (all content pages), Invites (History), Results (Data) and Users.


You can drill down to view individual ‘child’ accounts or view all linked accounts. Please note that this is a viewing window only (i.e. you can view information in related accounts, but you remain logged into the original account).  You need to use the Switch accounts tool to physically move from one account to another.

R

KS Help Notes_Admin 06_Support Ticket System


SUPPORT TICKET SYSTEM


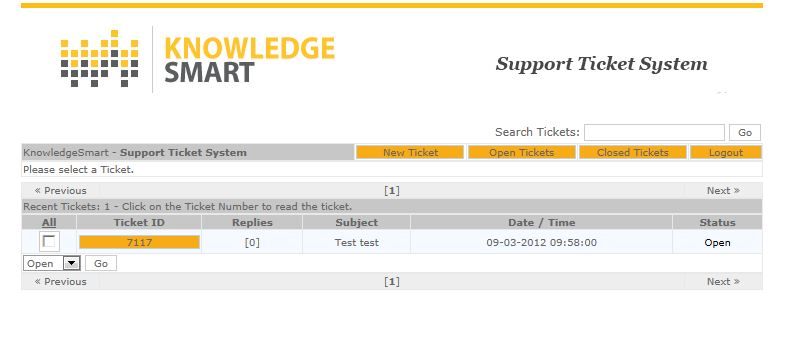
If you have any technical support issues, the fastest way to receive a response is to raise a support ticket, using the integrated KS Support Ticket System.

Log into your KS dashboard and select the Support link, which is located at the foot of each page.


If you haven’t registered on the support system, click the Register link and create your user profile.  Please note that your login information for the support system can be the same as your KS admin dashboard user login information, or, if you prefer, you can create a different user profile.


To log in to the support system, click on the Log In link and enter your username and password.


To create a support ticket, select the New Ticket link and provide a summary of your query in the space provided.  You can add accompanying files or screenshots, by browsing for the file and adding as an attachment.

Hit the Submit button to send your ticket to the KS technical support team.


Your ticket will be assigned an ID number, which you can use to track your support query, until it is resolved.  Click on the Open Tickets link to monitor progress of any outstanding issues and communicate with the KS technical support team.


Use the Search Tickets tool to locate support tickets relating to specific keywords.


You can re-open old tickets at any time, by selecting the Closed Tickets link and clicking on Reopen Ticket.


When you have finished adding or amending your support ticket information, select the Logout link, to exit the KS Support Ticket System.

R

KS Help Notes_Admin 05_Passwords


CHANGING A KS PASSWORD


When you are assigned your initial password by the KS system, it is generated by a software program. Consequently, it is a random series of characters and numbers. When you first log in to your dashboard, we suggest you change your system generated password, to one of your own choosing, as follows:

Hit the Change password link, top right of your dashboard page. Copy & paste your system password in the first box. Enter your own password in box 2 and repeat in box 3. Then hit the Change password button – and you're done!


RE-SETTING A KS PASSWORD

If you forget or lose your KS password, you have the option to re-set the password at any time. Go to the login page (https://online.knowledgesmart.net), hit the Admin Dashboard button and click the Reset password link underneath the Log in box.


This takes you to the password re-set page. Type in your KS username and hit Submit.  You will be sent a new password to your registered email address.


R

KS Help Notes_Admin 04_Logging in to the Dashboard


LOGGING IN TO THE KS DASHBOARD


How do KS administrators access and log in to the KS system?

Go to the KS website homepage (www.knowledgesmart.net) and click on the CUSTOMER LOGIN link, top right.


This takes you to the KS admin dashboard landing page.  Here is the direct link:  https://online.knowledgesmart.net.


To access your KS admin dashboard, click on the Admin Dashboard link.  Enter your administrator User name and Password and hit the Log in button.  (NB KS usernames are usually FirstnameLastname).


And that's it.  You are now logged in to your KS dashboard. The first page you will see is the Library > Published Content > KS Tests page, which lists all of the 'off the shelf' tests available on your account.


R